Epoxy Seal Coating - for steel road plates, to bond grit to the surface for skid resistance
Summary - how to coat a steel road plate
1. Pressure Wash and epoxy solvent clean - surfaces should be mud, dust and grease free
2. Warm if possible in the Winter - using a dry source of heat (not bottled gas)
3. Apply resin - Epoxy Seal Coat Grey - 1 mm thick - about 1 litre per square metre - use a medium pile roller, brush or squeegee
4. Apply grit - Grit Grade Mixed 1 - 3mm - at 2.5kgs per square metre.
Click here to buy a Road Plate gritting Kit
Typical road plate - 8' x 4' - 1.83m x 1.22m = 2.23 square metres, allow 2.5 litres of resin and 6kgs of mixed grit.
Click Here to read the Road Plate Gritting Data Sheet
How much resin do I need to re-grit a steel road plate
Epoxy Seal Coat is supplied in the Road Plate Kits at 2.5 litres per 8' x 4' plate, (2.23 square metres), but it can be purchased separately in 1 litre, 2.5 litre and 5 litre packs.
Allow up to 1 litre per square metre (max. 1mm of resin thickness) for mixed Grit size 1 - 3mm
Accessories: Epoxy Cleaner, 250cc, rubber squeegee
Click here to buy a Road Plate gritting Kit
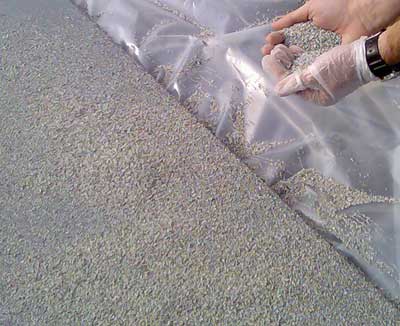
Re-gritting a steel Road Plate - throw the grit upwards in handfuls
Click Here to read the Road Plate Gritting Data Sheet
How to re-coat friction surfaces on Road Plates
1. Strip any existing loose grit with a wire brush or angle grinder, grit blast or needle gun.3. Strip the bare surface or bald spots to clean bare metal.
4. Clean with our Epoxy Cleaner, 250cc to ensure that no oil or grease remains in the metal.
5. Regrind if necessary to eliminate any solvent cleaner smear film. Wipe over with a clean White Cloth.
6. Wipe thoroughly again with the White Cloth - if any dark marks appear on the White Cloth repeat steps 4 - 6 until the cloth remains perfectly white - this is the secret of success - any dirt left on, no matter how little, with reduce the resin bond and lead to bald patches, where the resin has fallen off.
6. Lay clean cardboard or plastic sheeting around the edges of the plate to catch aggregate (grit) that falls off during coating, for re-use.
7. In the Winter, or for cold conditions, heat the metal with dry heat - use electrical heaters with fans. Avoid gas heating (particularly Propane), because of the water produced, which can cause condensation on the steel and loss of adhesion. Maintain background heat until the resin is completely hard. This may take up to 2 days during cold weather. Lack of heat may also allow condensation to form on the resin and the aggregate (grit) may then fail to bond properly.
8. Apply Epoxy Seal Coat Grey with a smooth plastic spreader, roller, squeegee or brush, to a depth of 1mm.
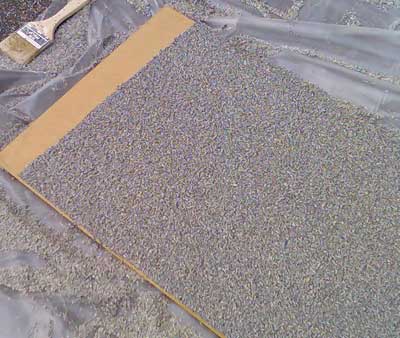
9. Apply clean, dust free Aggregate (grit) to the adhesive so that cover is complete, with some excess. Pat the aggregate (grit) into the resin very firmly with a clean wooden or metal object (plastering float, batten, cricket bat), or use a piece of clean hard plastic material. It is not necessary to apply another coat of resin, as long as the first coat is thick enough and the aggregate (grit) is fully bedded in.
10. Leave to cure for at least 24 hours, subject to temperatures being above 15 degrees C at all times. Maintain the heating for the whole period.
Accessories: Epoxy Cleaner, 250cc
IMPORTANT NOTES - applying resin to Steel Road Plates
In cold weather you must keep the metal surfaces above 5 degrees C. Below 5 degrees the resin curing will slow and curing will be delayed.
On cold, damp days condensation on the surfaces or on the resin can reduce resin and grit adhesion, so screen off the area to prevent draughts and warm up with heaters overnight.
In Winter adjust the resin temperature by placing the pots of resin in warm water.
For cleaning, use our Epoxy Cleaner, 250cc, cellulose thinners, epoxy thinners, or trichlorethylene.
To save grit lay the cleaned steel plate onto a plastic sheet
The plate MUST NOT BE USED until the coating is really hard. Make a test piece (of metal or wood) when the resin coating is complete. Coat the test piece with resin, without grit, and leave next to the gritted area. Test by first thumb pressure and then with a screwdriver before using the roller. When hard, the coating still continues to gain strength over several days.
Click for Resins and Grits in our Order Page
Click Here to read the Road Plate Gritting Data Sheet
TROUBLESHOOTING STEEL ROAD PLATE REGRIT
Resin comes off the metal - not clean enough, too cold when coated, condensation on the metal when coated, resin not fully cured.
Grit comes off the resin - condensation on the resin when gritted, grit too dusty, wet grit, grit not tamped into the resin when applied, resin not fully cured.
- Resin remains sticky - not mixed fully, too cold (resin stops curing at 5C), too damp, condensation on resin before or after gritting due to low temperature, or through using bottled gas heating.
Grits for metals - relining road plates, potato peelers, recoating brake rollers, blasting and refinishing
Prime quality fused Alumac produced from stringently controlled raw materials form the most durable grit surfaces for Brake Rollers.
Al203 content 94 -99%.
Packed in plastic tubs.
Grade 12, 2mm - 3mm, or Grade 16, 1mm - 2mm, or Mixed Grade 1mm - 3mm.
Grit Required per square metre, average:
Allow 2.5kgs per square metre
Typical Grit Sizes used:
Potato Peelers - 24 Grit
Class 4 Rollers - 12 or 16 Grit
Class 5 Rollers - 12 or 16 Grit
Class 7 Rollers - Mixed Grit 1 - 3mm natural aggregates
Steel Road Plates - Mixed Grit 1 - 3mm natural aggregates
Grit to excess and collect for re-use. When dry brush off excess grit.
Call us on 01626 872886 for calculation of your Road Plate, Potato Peeler or Brake Roller cleaning and finishing needs.
Discuss the Grades of Grit available to ensure satisfaction.
Click here to buy a Road Plate gritting Kit
Click Here to read the Road Plate Gritting Data Sheet
Road Plate Gritting Kit - summary
Reliable Resin & Grit Kits for Safe, Durable Road Plate SurfacingWhen it comes to road plate safety, having the right materials makes all the difference. Our premium Resin & Grit Kits are specifically designed to provide a fast, effective, and long-lasting anti-skid surface for road plates, helping you improve safety for motorists, cyclists, and pedestrians alike.
Each kit contains high-quality resin and carefully selected grit, supplied in the correct quantities for efficient application and consistent results. Easy to use and suitable for a wide range of site conditions, our kits help reduce installation time while delivering excellent durability and skid resistance.
With dependable stock availability, competitive pricing, and prompt delivery, we are committed to supporting your projects and keeping your workforce productive.
Contact us today to discuss your requirements or place an order. We look forward to helping you achieve safer, compliant road plate installations.
UNIQUE BENEFITS
- special cleaning fluid for the final wipe down to eliminate residues than can cause loss of adhesion
- one pack of two part resin per plate, no waste, no measuring
- special grit that has been graded and cleaned for this task
OUR Order Page
- RESINS Order Page - this Site, for Epoxies and other building repair resins
Contact I History I Links I Privacy Policy | Returns Policy I Resins Order Page | Technical | References
![]()
Property Repair Systems
T: 01626 872886
E: Mail us help@propertyrepairsystems.co.uk
Site written by: David Moore
David Moore, B.A. (Hons.), C.T.I.S., C.R.D.S. Technical Author
Google+
Other Property Repair Systems Sites:
www.drywallandfloor.co.uk - membranes for lining damp walls, floors, basements and cellars
www.propertyrepairsystems.co.uk - our Home Site
www.steel-fire-paint.co.uk - treat steel with Intumescent Paint to provide fire protection
www.timber.org.uk - systems of repair, with step by step methods
www.timber-repair.co.uk - how to repair timber beams